Drums break. Especially drums that get as much use as those belonging to the Fife and Drum Corps. (I will not be the one to blame the youthful exuberance of teenagers.) But even broken drums can be redeemed, an exercise that, when time allows, takes place in a smallish back room of the Fifes and Drums Building. Stewart Pittman, the leader of the corps, showed me how he goes about doing some of the repair work.
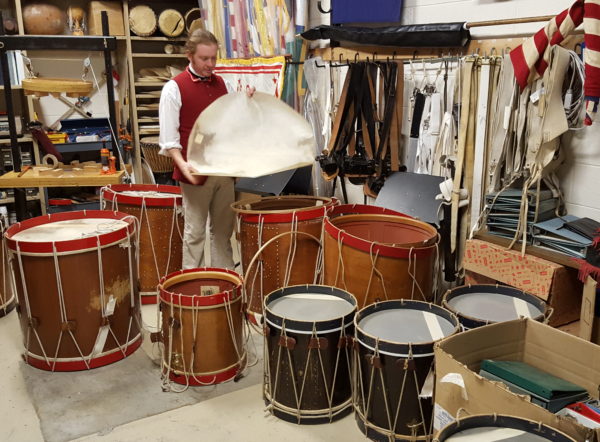
The Corps owns 135 drums. 122 of them are still used for performances. The others are displayed as part of the collection of memorabilia in the entrance hall and in the practice room. And on the day I visit, at least a dozen are in the back room awaiting repair.
Our drums are actually incredibly durable. Their 18th-century counterparts certainly had to be rugged to stay in service on a battlefield. The drums I’m looking at have suffered a variety of injuries. Most have broken heads (the playing surface); a couple have broken snares or frayed rope. The one pictured above is warped like a roller coaster on the batter head, the result of uneven tension on the rope.
The spare parts hanging high on one wall reveal the simplicity of drum construction. They are essentially made up of five interlocking hoops, two drum heads, and a single length of rope that holds it all together. The barrel-like hoop is the shell, which is just a thin piece of wood rolled into a cylindrical shape, then glued and tacked where the two ends meet.
If you’ve noticed elaborate tack patterns on drums, that’s why they’re there, making a virtue of necessity. Shells are typically 16 inches today. In the Corps’ early years, they used long drums, which were 18 inches, making a deeper pitch. Also, heavier.
Two flesh hoops hold the playing surface, which can be either calfskin or goatskin (or, for the bad-weather gear, plastic). Stewart says that goatskin holds up better but he prefers the sound from calfskin. He orders an equal amount of each from a supplier who gets them from Asia.
Counterhoops on either end of the drum hold the rope that secure all the hoops together. The drum’s sound can be altered by varying the tension on the counterhoops.
Today Stewart needs to replace a torn drumhead that was damaged at the Virginia International Tattoo in April. It’s a 2008 drum used in special performances. Each piece of a drum is labeled with the drum’s unique number so they can keep track of which drum each piece belongs to. This one is number 5006. A record is kept for each drum indicating when it had any repairs done.
After stripping the old drumhead off, Stewart works his way around the flesh hoop to remove any residue and trim off any splinters.
A new calfskin is pulled out and soaked in a bucket of water for about 20 minutes to make it pliable enough to work with.
The tools are like an assortment of putty knives with blunt, curved edges. Stewart made the tools by taking brass-heated, bent, and filed down-and attaching the pieces to handles made of broken drum sticks. The tools are used to get the skin to tuck under the hoop. It’s possible to do it by hand, but the tools certainly help you get a grip on the wet skin.
Once the skin has soaked for long enough, Stewart lays the skin on the table “hairy side down.” I can’t particularly tell which side is which, but Stewart can easily enough, pointing out dimly visible follicles. He centers the hoop on the skin.
Beginning with the four compass points, he uses his hand to stretch the skin over the edge of the hoop and the tool to tuck it underneath. It requires a fair amount of force to push the skin as far as possible under the hoop.
This is repeated until all the skin has been tucked as tightly and evenly as possible. You want to make the skin as smooth as possible along the inside of the hoop. There are still bubbles and wrinkles. The excess skin clings to the outside of the hoop and will stick to itself as it dries. Most of the bubbles will go away.
I got a chance to try my hand at tucking the skin. It’s almost rubbery and tight, and not particularly easy to grip. Maybe if I had longer fingernails. I repeatedly pull some of the skin back each time I try to withdraw the tool. But I manage to do a respectable-enough job, or at least that’s what Stewart told me.
Beeswax is spread around the leading edge of the drum shell for lubrication. This helps keep the calfskin from drying to the shell.
Then the new drumhead can be pushed gradually onto the shell. John Harbour, the first fifer in the Corps’ history, who leads tours of the building, helps out. You want the head to dry so it’s about a quarter-inch below the shell, creating a “shoulder” or “collar” effect.
Finally, the ropes are hand-tightened to apply even pressure. After drying for two days, it will be time to put the snares back on and adjust the ropes and time to move onto other projects-maybe replacing the snare, or making a new flesh hoop, or restringing the rope on a drum-whatever it takes to keep it in the field.

Are Behind the Field Musick tours available in the Fall or only the summer?
They are scheduled to run indefinitely. Check the schedule online to be sure, but if anything, we’re hoping to add more times.
Thank you. I had seen on the website dates through Aug 5 only, but glad to hear it is planned to run indefinitely as I plan an Oct visit. I look forward to it!
I double-checked with Mr. Harbour, and he says that it should be running until the week before Thanksgiving, then resuming after President’s Day. It will move up to 3:30 p.m. when the time changes in October.
Thanks so much for confirming.